

I am in love with the way this came out.

Here's how this DIY got started.
We had an interior wall in our dining room that has the breaker box in it. We wanted it to be a focal point, but had to figure out a way to hide the breaker box, but not sacrifice design.
First goal: Hide that utility box but not so well that we can't get to it when I blow a fuse.
Second goal: This is a focal point in our dining room so we need to be practical but make it look awesome.
My Inspiration:
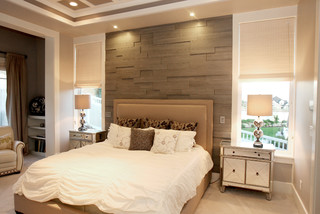
Contemporary Bedroom by Orem Paint & Wall Coverings Soelberg Industries
My DIY Thinking:
"I can do that! (with a bunch of help from my husband and family)"
I did some sketches to make sure that what I thought we could do was possible. I then showed it to my husband, and we worked through some engineering flaws with the wall and my design.


Here's that darn breaker box that we had to work around.

Here was a little wall artistry that I performed to make sure my hubby knew how awesome I thought he was.

We used 11/32 inch waferboard to raise or lift the boards off of the wall. My husband and son team-worked those on the outside, while my daughter and I installed the boards inside to keep the project moving.
We used 1 x 4 and 1x6's for the design. We took some time to draw those out to accommodate for the breaker box, as well as the design factor. I penciled those measurements by drawing on the wall, so the boys could get the measurements of the next board and stay ahead of us by cutting.
We used 1 x 4 and 1x6's for the design. We took some time to draw those out to accommodate for the breaker box, as well as the design factor. I penciled those measurements by drawing on the wall, so the boys could get the measurements of the next board and stay ahead of us by cutting.


I didn't want there to be gaps between the boards, so we used caulk to seal them up. My daughter helping caulk as we went.

Then this darling thing happened to our family, and we got off track for awhile. However, the white puppy drywall dust prints throughout the house got me back on track VERY QUICKLY!

Applying the turquoise color (Schooner A58-5 from Olympic Paint) - Can you believe my son and husband picked out this color? I was thinking something more muted like cream with some sheen pearl highlights, but they both really wanted this to be a bright wall.

My niece and I along with some help from my son helped apply the bronze highlights. This was done with a copper spray paint and glaze. We learned quickly that we had to apply the glaze to a small section of the wall, then apply a few dashes of spray paint, and then using our paint brushes manipulate it on the wall. We also learned that there is not a CORRECT way to do this.
It's art. It's a wall. It's yours. Just go for it.
By the end of it, we each had our own methods, but when you stepped back, it ended up looking wonderful.
It's art. It's a wall. It's yours. Just go for it.
By the end of it, we each had our own methods, but when you stepped back, it ended up looking wonderful.
The Final


If you are asking where my breaker box went, it's there, and it's hidden behind a panel of about 6 boards that are not fastened to the rest of the wall. My brilliant hubby attached them to magnets, then stuck them on the breaker box. The other boards around it help hold them in place.
Also, because I wanted some lighting on my walls, but didn't have any outlets up that high, I had to be creative with the lighting.
Sconces from Hobby Lobby ($14.99/piece), Globes from Lowes ($4.99/piece), Lights are LED handheld flashlights from Lowes ($3.97/piece)

